Import SDK
A. Import SDK (Android)
Step 1: Setup in Unity
-
In Project Settings, setup correct Package Name, KeyStore before exporting.
-
Import Package UnitySDKFramework.unitypackage.
-
Set Platform to Android
-
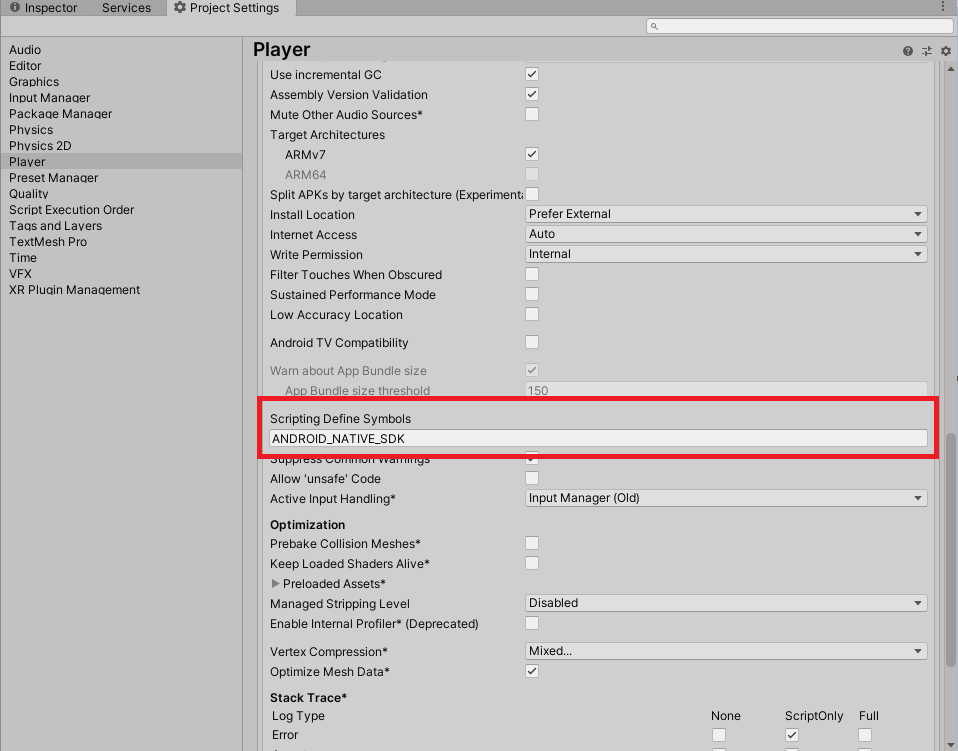
In Project Settings -> Tab Android -> Tab Other Settings -> Field Scripting Define Symbols -> Add "ANDROID_NATIVE_SDK".
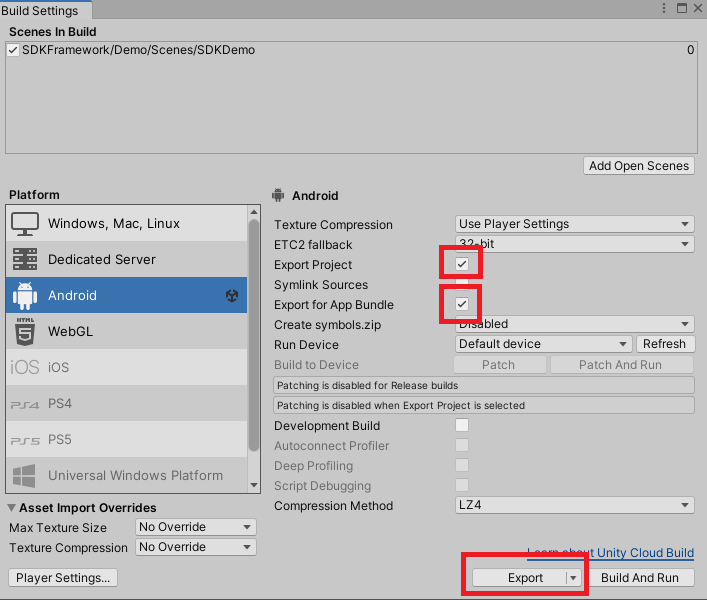
- Click File -> Build Settings -> Export Project.
Step 2: Setup in Android Studio
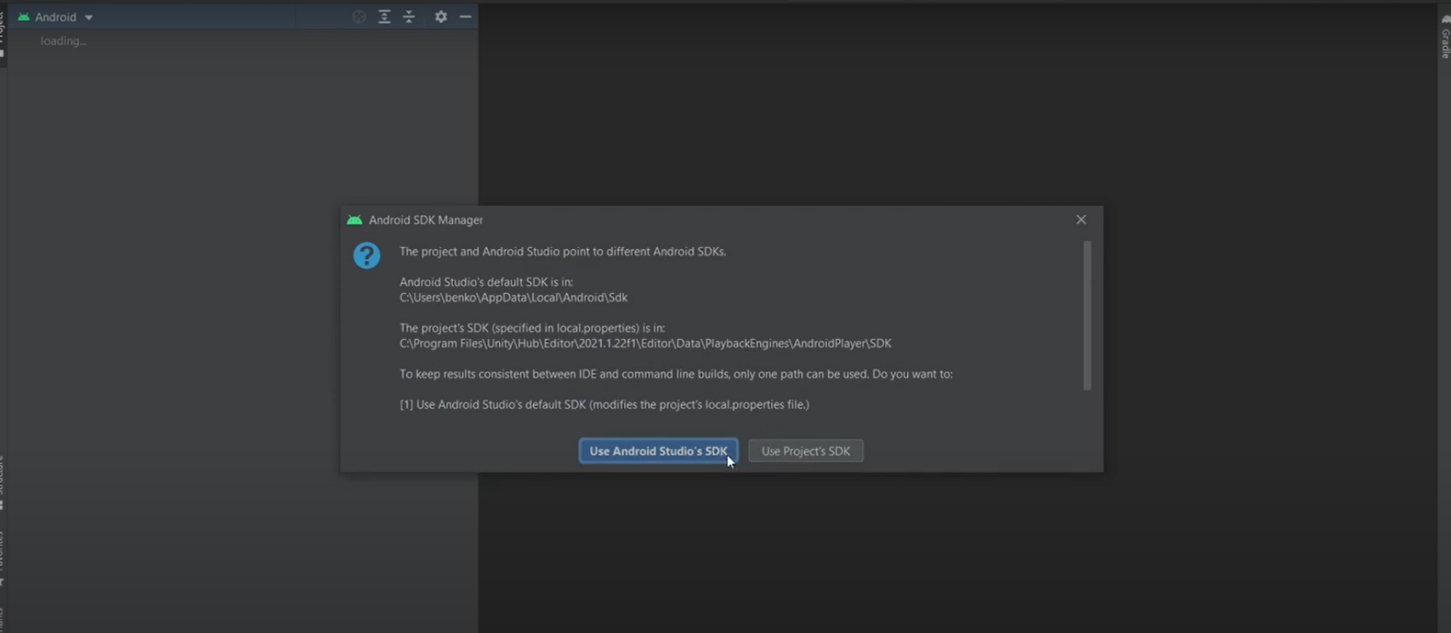
- Open the project you just exported, choose "Use Android Studio's SDK" if there have a popup asking like below.
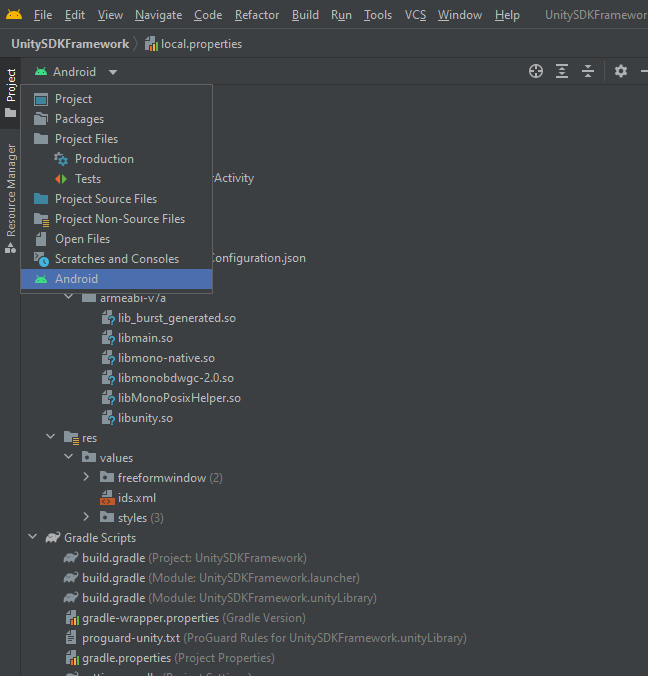
- Setup as image below.
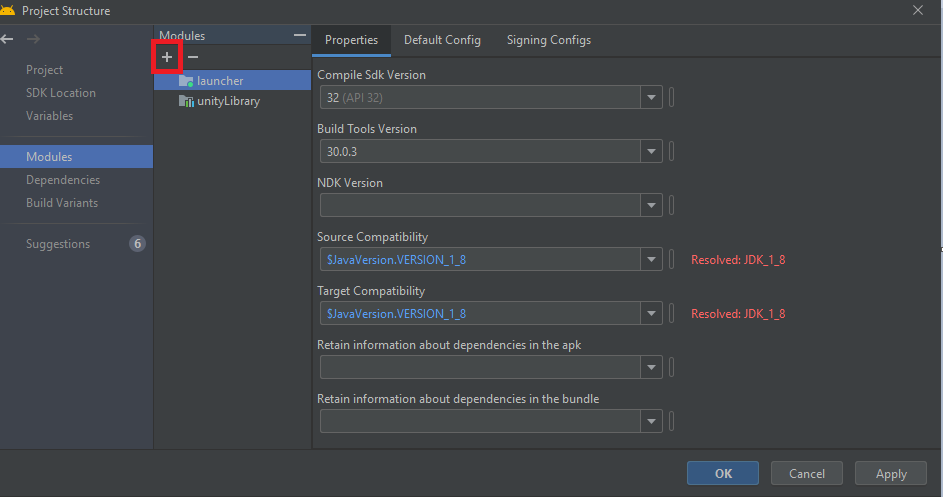
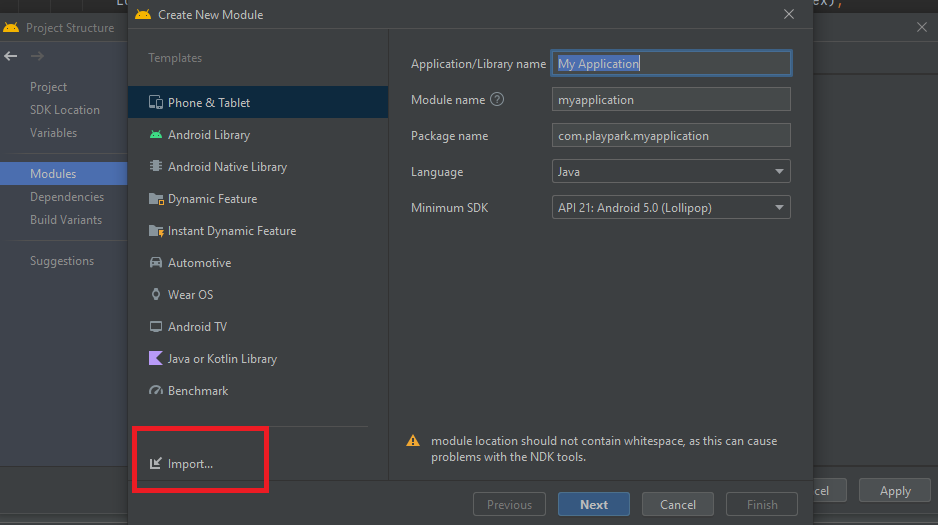
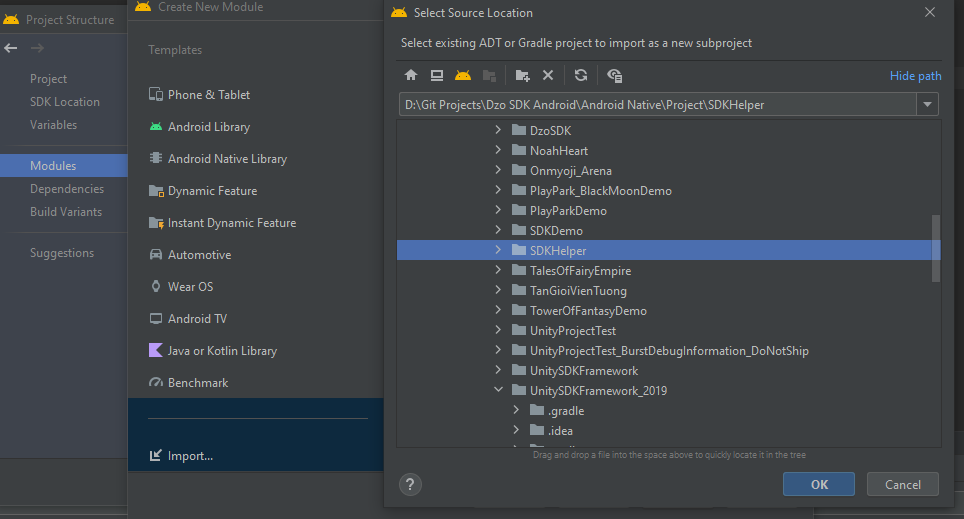
- Copy folder SDKHelper into your pc, and in Android Studio, import module SDKHelpe: File -> Project Structure -> choose SDKHelper -> Finish
- Copy SDK to folder ...\SDKHelper\libs and rename to DzoSDK.aar

-
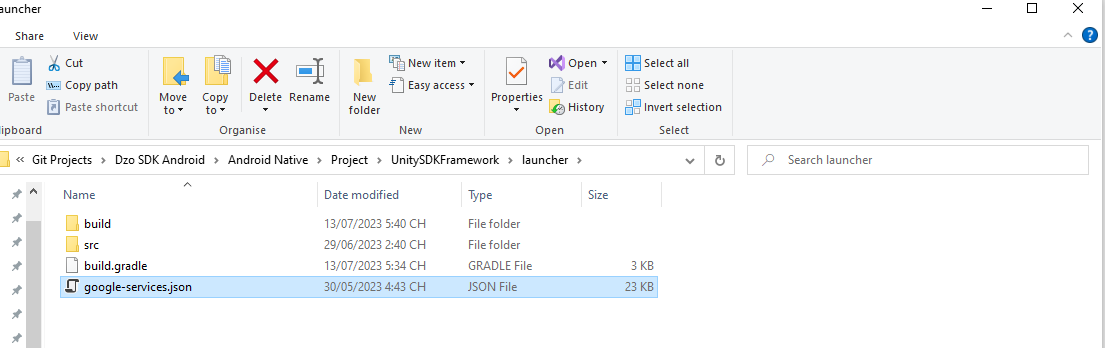
Add a Firebase configuration file (Important)
- Copy file google-services.json to folder
{Project}/launcher/
- Copy file google-services.json to folder
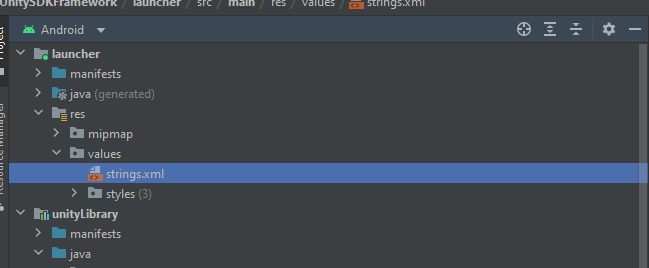
- Config file strings.xml (as example) in folder
{Project}/launcher/src/main/res/values
<resources>
    ...
    <string name="app_name">{YOUR_APPNAME}</string> <!-- Ex: Demo App -->
    <string name="DzoSDKServer">0</string>  <!-- 0 : Server Test | 1 : Server Real-->
    <string name="publicKeyTest">{YOUR_PUBLICKEY_TEST}</string> <!-- public key use for Server Test -->
    <string name="publicKeyReal">{YOUR _PUBLICKEY_REAL}</string> <!-- public key use for Server Real -->
    <string name="serviceID">{YOUR SERVICE ID}</string>
    <string name="buildForGlobalAPK">false</string>

    <string name="useDefaultBroadcast">true</string>

    <string name="facebook_app_id">{YOUR FB APP ID}</string> <!-- Ex: 123456 -->
    <string name="fb_login_protocol_scheme">fb{YOUR FB APP ID} </string> <!-- Ex: fb123456 -->
    <string name="facebook_client_token">{YOUR FB CLIENT TOKEN} </string> <!-- Ex: 123456 -->
    <string name="fb_ContentProvider">com.facebook.app.FacebookContentProvider{YOUR FB APP ID}</string> <!-- Ex: com.facebook.app.FacebookContentProvider123456-->

    <string name="google_web_client_id">{YOUR GOOGLE WEB CLIENT ID}</string>

    <string name="useAppsFlyerTracking">true</string>
    <string name="AppsFlyer_DevKey">{AppsFlyer_DevKey}</string>

    <string name="useFirebase">true</string>
    <string name="useFirebaseTracking">true</string>
    <string name="firebase_default_notification_channel_id">{BundleID}.urgent</string> <!-- Ex: com.test.app.urgent -->
    ...
</resources>
-
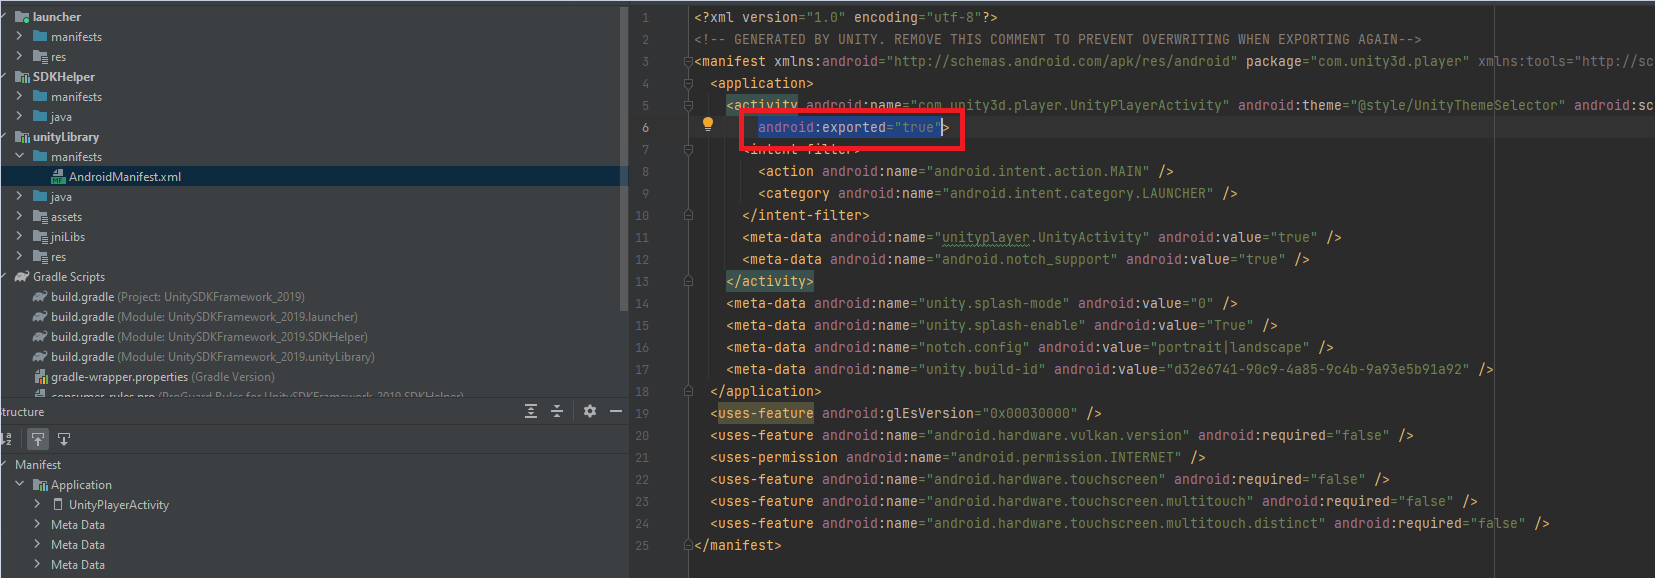
Config AndroidManifest.xml of module unityLibrary:
- Add "android:exported="true" to tab <activity> like below:
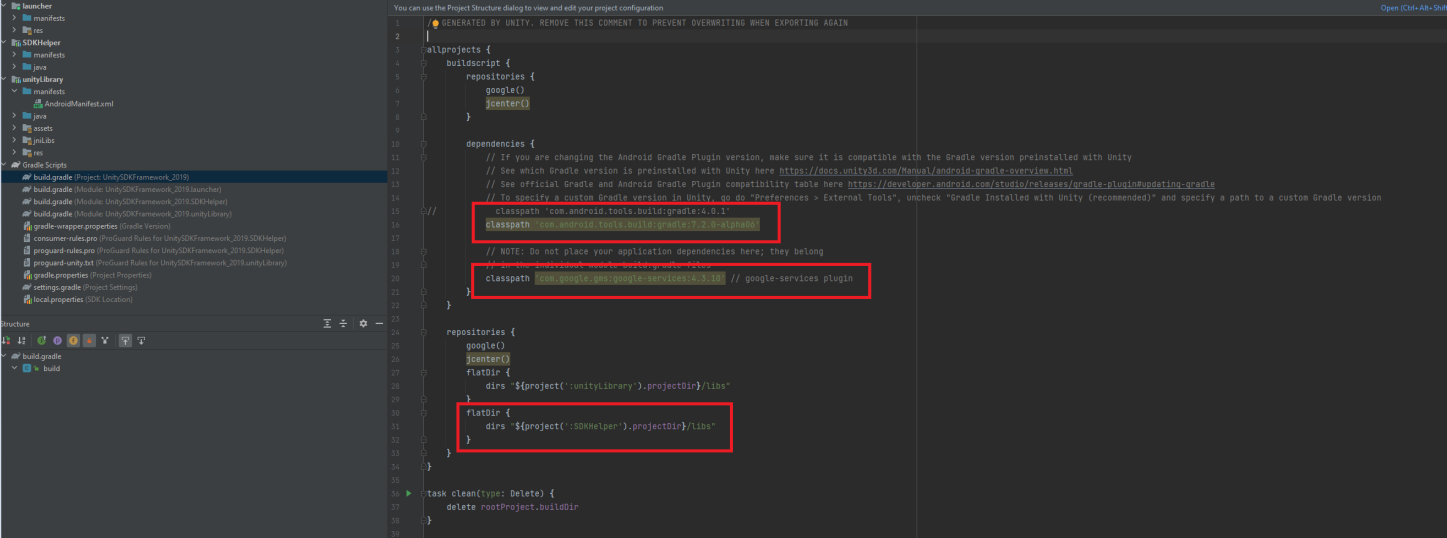
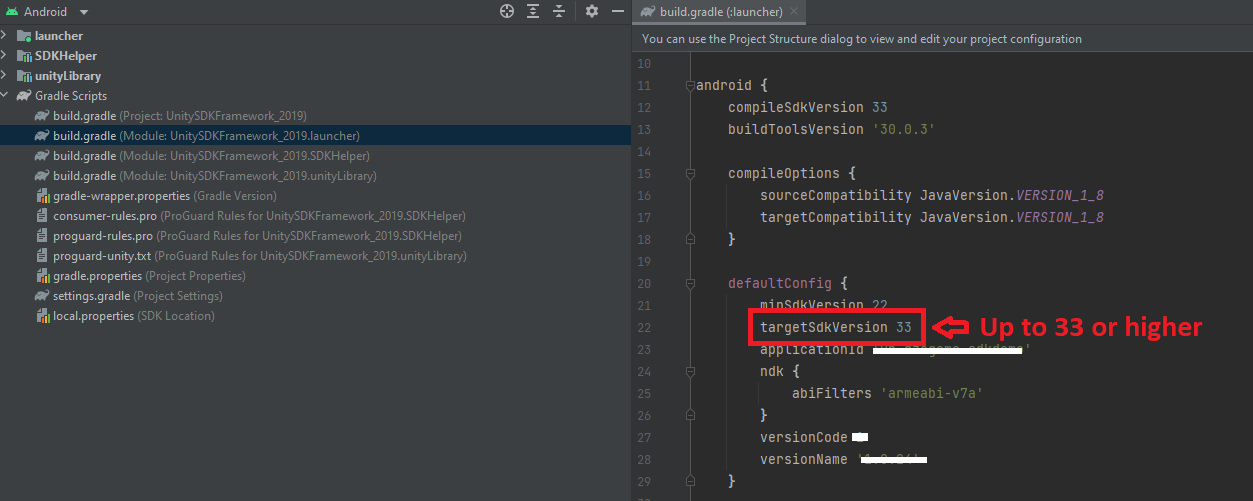
- Config file build.grade(Project) like below:
With:
dependencies {
    ...
    classpath 'com.android.tools.build:gradle:7.2.0-alpha06'
    classpath 'com.google.gms:google-services:4.3.10' // google-services plugin
}
repositories {
    ...
    flatDir {
        dirs "${project(':SDKHelper').projectDir}/libs"
    }
}
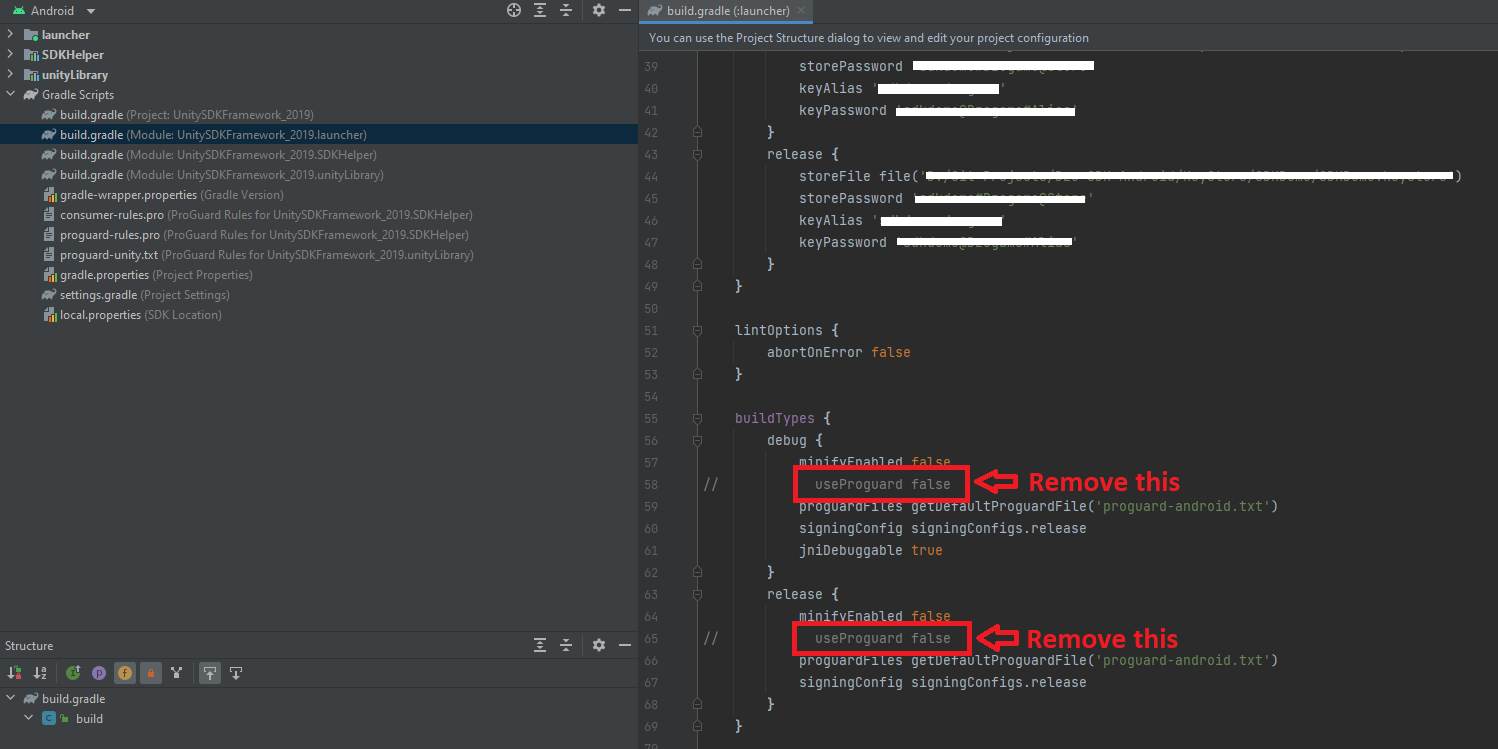
- Config file build.grade (Module: ... launcher) like below:
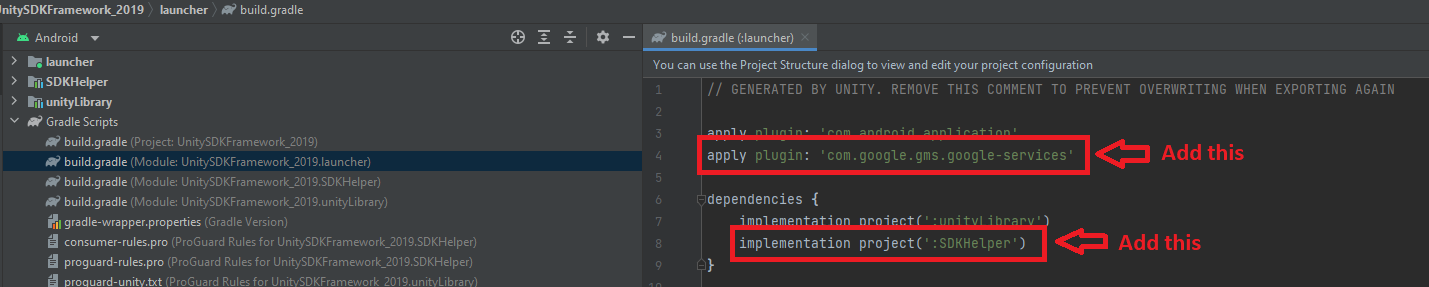
With :
    apply plugin: \'com.google.gms.google-services\'

    implementation project(\':SDKHelper\')
- Config file build.gradle (Module: ... unityLibrary)
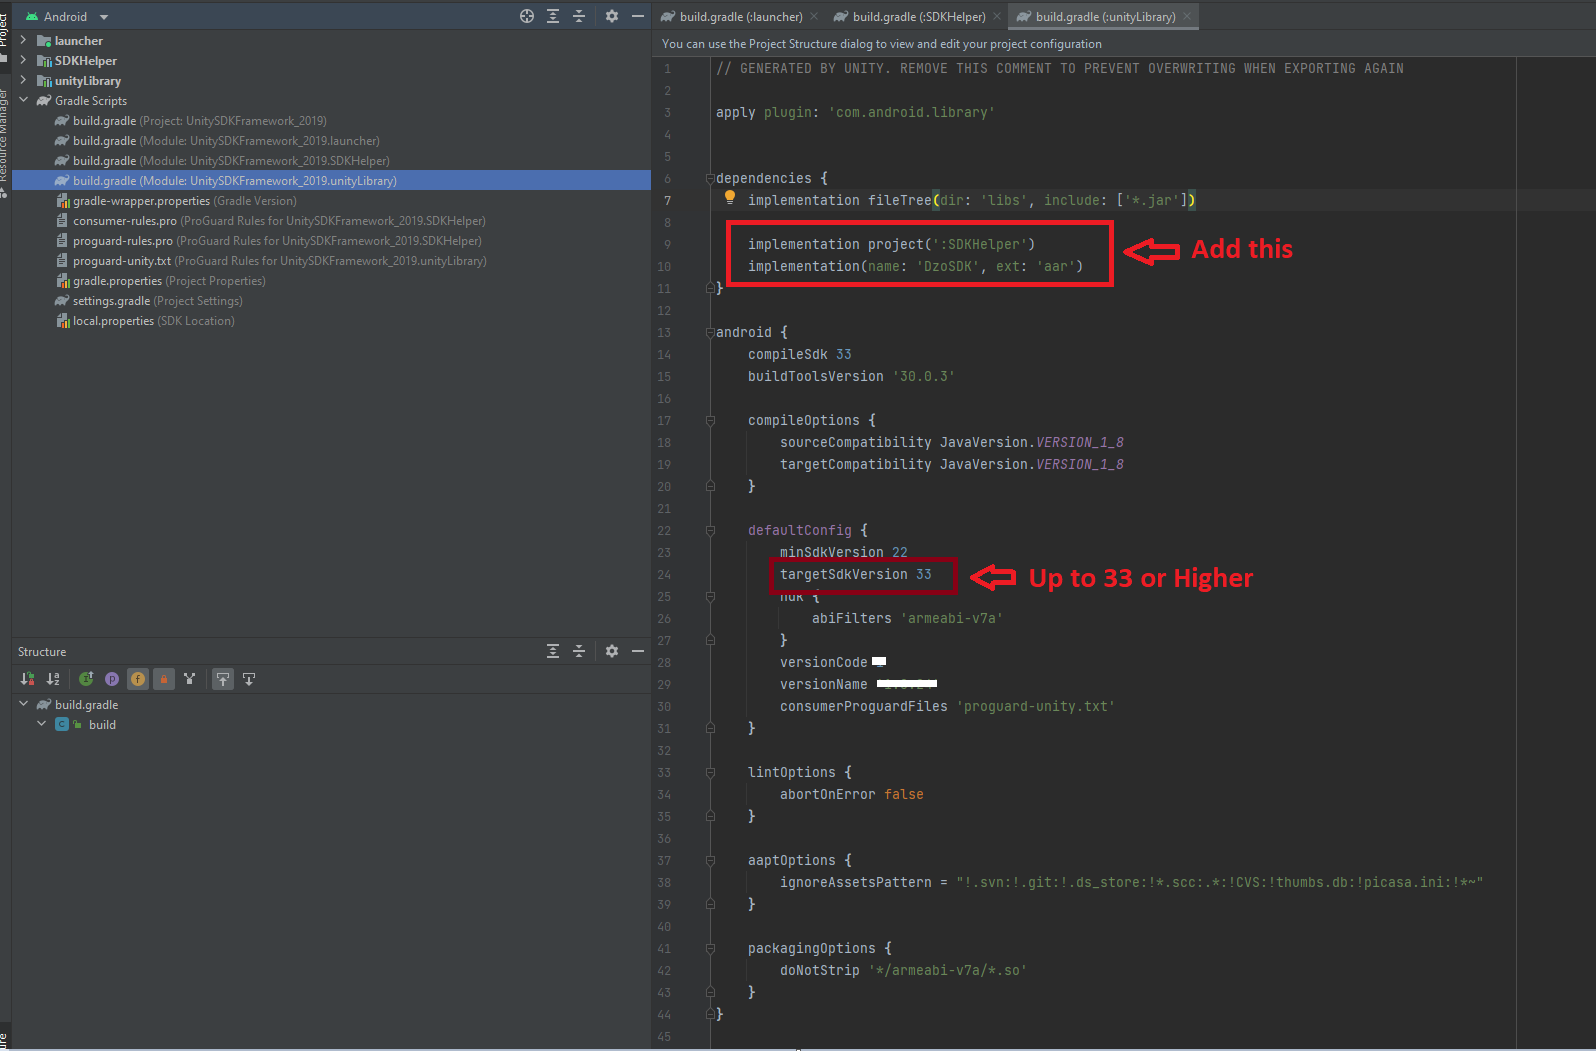
With:
    implementation project(\':SDKHelper\')

    implementation(name: \'DzoSDK\', ext: \'aar\')
-
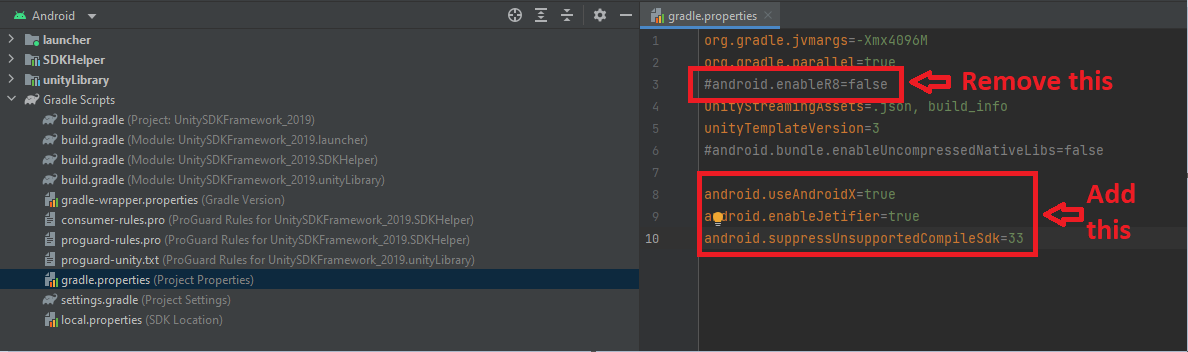
Config file gradle.properties (Project Properties).
-
Remove android.enableR8=false
-
Add
    android.useAndroidX=true
    android.enableJetifier=true
    android.suppressUnsupportedCompileSdk=33
- Config file gradle-wrapper.properties (Gradle Version).
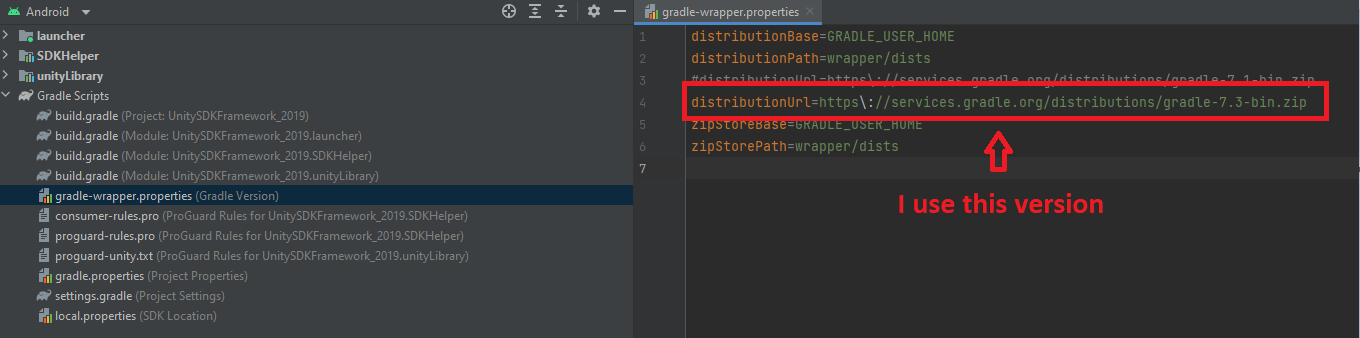
With:
distributionUrl=https\\://services.gradle.org/distributions/gradle-7.3-bin.zip
- Config file local.properties (...)
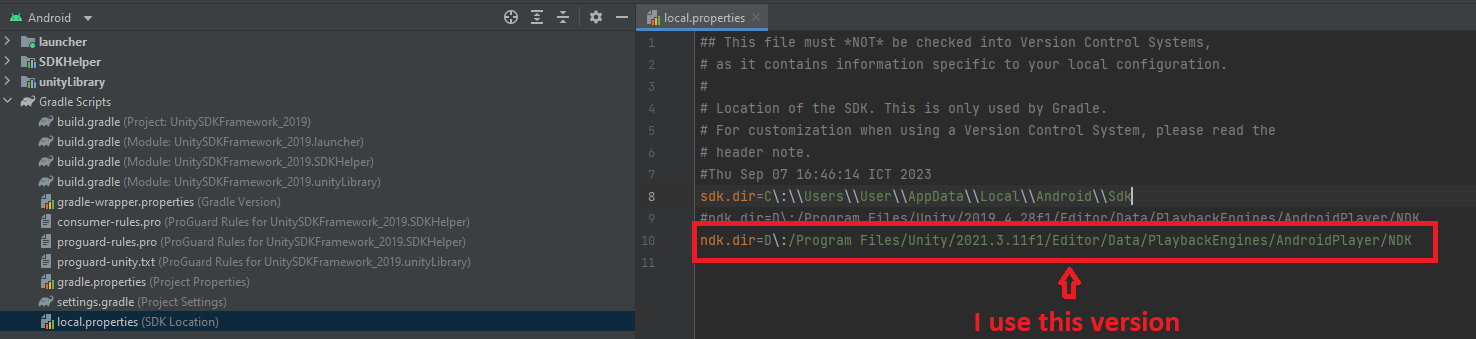
With:
ndk.dir=D\\:/Program Files/Unity/2021.3.11f1/Editor/Data/PlaybackEngines/AndroidPlayer/NDK
- Add code into UnityPlayerActivity.java
import vn.dzogame.library.DzoSDK;
...
@Override
protected void onActivityResult(int requestCode, int resultCode, Intent data) {
    Log.d(DzoSDK.TAG, "onActivityResult >>> requestCode:" + requestCode + " | resultCode: " + resultCode);
    super.onActivityResult(requestCode, resultCode, data);
    ...
    DzoSDK.GetInstance().OnActivityResult(requestCode, resultCode, data); // <== Add this code
}
...
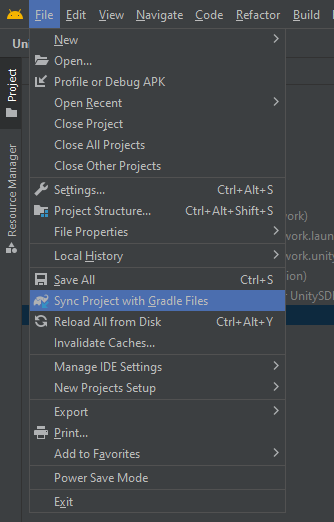
- Click File -> Sync Project with Gradle Files
B. Import SDK (Ios)
Step 1: Setup in Unity
-
In Project Settings, setup correct Bundle Identifier.
-
Import Package SDKFramework.unitypackage.
-
Set Platform to IOS
-
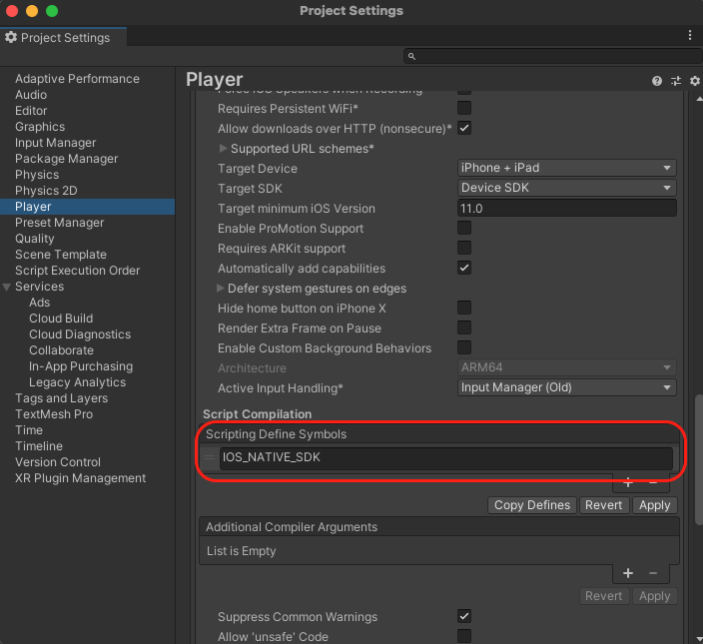
In Project Settings -> Tab IOS -> Tab Other Settings -> Field Scripting Define Symbols -> Add "IOS_NATIVE_SDK"
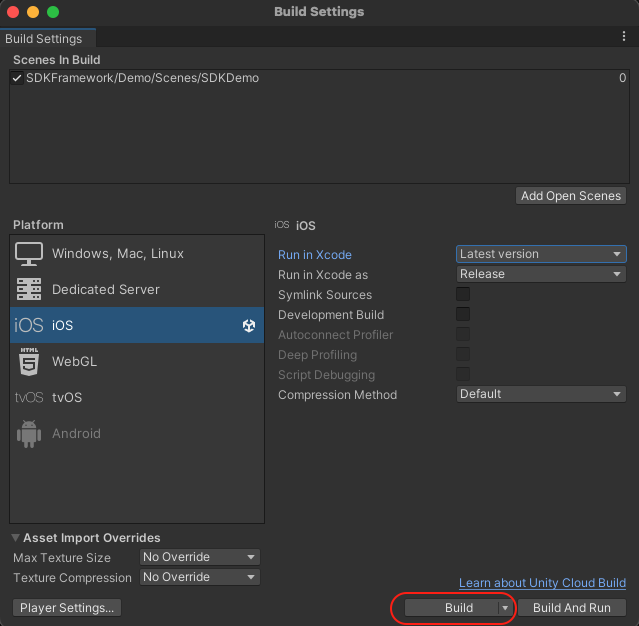
- Click File -> Build Settings -> Export Project.
Step 2: Setup in Xcode
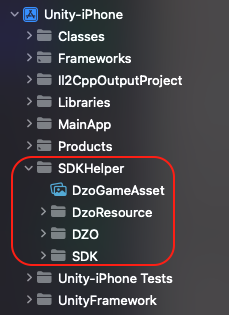
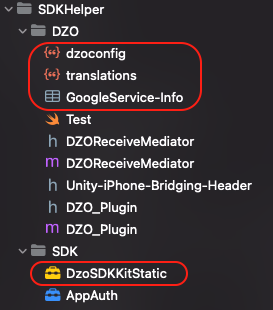
a. Drag and drop the provided SDKHelper folder into the project, which will contain the necessary files to configure the project such as images, dzoconfig.json file, translations.json, GoogleService-Info.plist, SDK functions, SDK static libraries.
A popup will appear. Please check the options as shown in the image below:

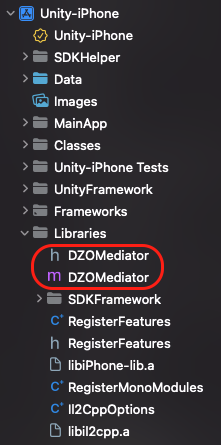
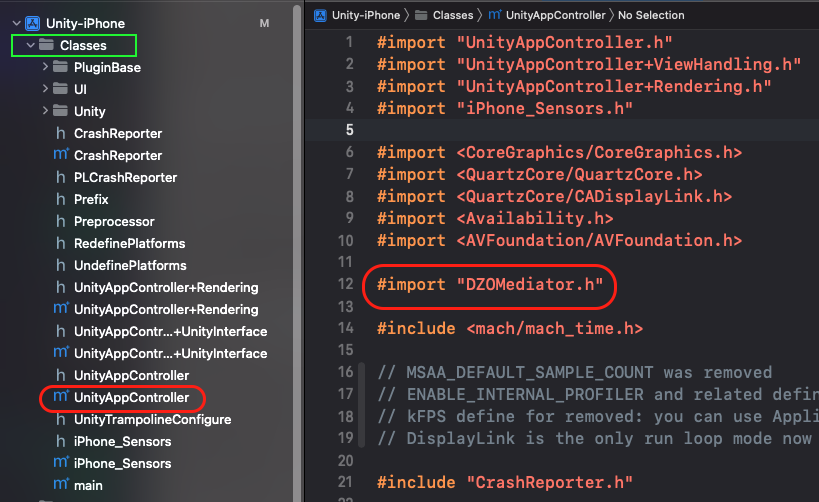
b. Add 2 file DZOMediator.h and DZOMediator.m to Unity-iPhone/Libraries/DZOMediator
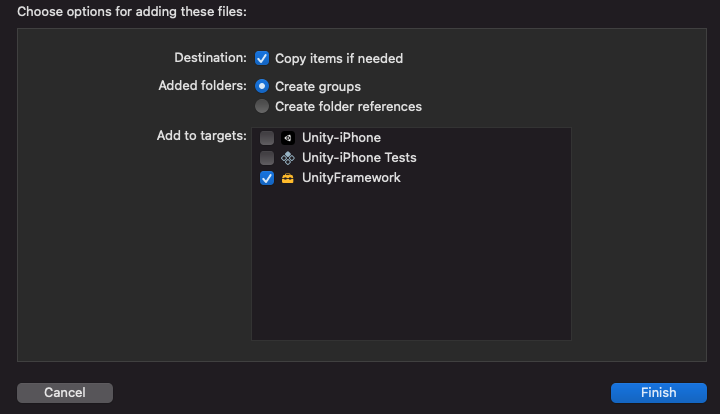
When dragging and dropping these two files, a popup will appear. Please check the options as shown in the image below:
c. Import DzoSDKKitStatic.framework
Drag and drop the DzoSDKKitStatic library into the SDK folder.
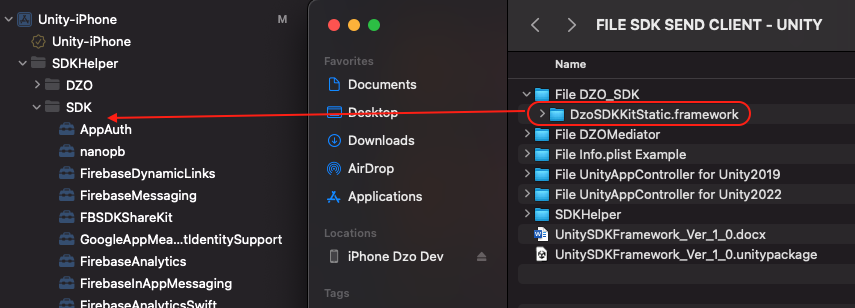
A popup will appear. Please check the options as shown in the image below:
Drag and drop the following files in a similar manner: GoogleService-Info.plist, dzoconfig.json, translations.json. Once the drag and drop is complete, it should look like the image below:
d. Config for dzoconfig.json
Configure the values in the dzoconfig.json file.
{
    "config": [{
        "publisher": [{
            "gamename": "{GAME_NAME}",
            "key_test": "{YOUR_PUBLICKEY_TEST}",
            "key_real": "{YOUR_PUBLICKEY_REAL}",
            "serviceid":{YOUR_SERVICE-ID},
            "packet":"{YOUR BUNDLE ID}",
            "useFirebaseTracking":1,
            "firebase_default_notification_channel_id":"",
            "firebase_CLIENT_ID":"{YOUR_FIREBASE_CLIENT_ID}",
            "useAppsFlyerTracking":1,
            "AppsFlyer_DevKey":"{Appflyer_DevKey}",
            "AppsFlyer_Apple_App_IP":"",
            "myPublisher":"{YOUR_PUBLISHER}",
            "multiLang":0,     // 0 for Dzogame | 1 for Playpark
            "defaultLang":"VI", // VI for Dzogame |  EN, TH, ZH, ID for Playpark
            "forceMultiPayment":1
        }],
        "layout_notice":[{
            "background":"#B8860B",
            "background_opacity":0.5,
            "textcolor":"#A52A2A",
            "font_size":30,
            "height":60,
        }],
        "layout_broadcast":[{
            "background":"#000000",
            "background_opacity":0.4,
            "textcolor":"#F99022",
            "font_size":30,
            "height":60,
        }],
        "posision_default":[{
            "buttonDzoHome":"",
            "tag18Plus":"",
        }]
    }]
}
-
Customize the position with 8 anchor points:
-
topLeft, topCenter, topRight
-
centerLeft, centerRight
-
bottomLeft, bottomCenter, bottomRight
-
Example:
    "posision_default":[{
        "buttonDzoHome":"centerRight",
        "tag18Plus":"bottomRight",
    }]
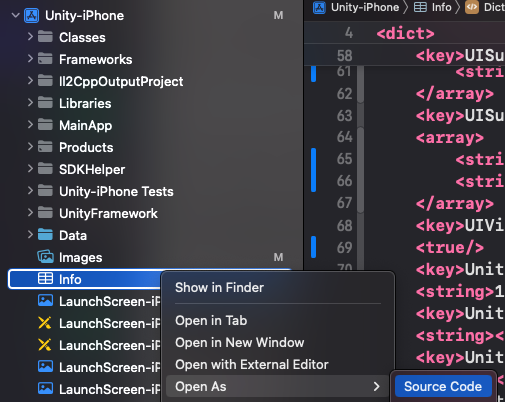
e. File Info.plist
Right click on file Info.plist > Open As > Source Code
Next, scroll down to the bottom and add the code BEFORE the </dict></plist> tag
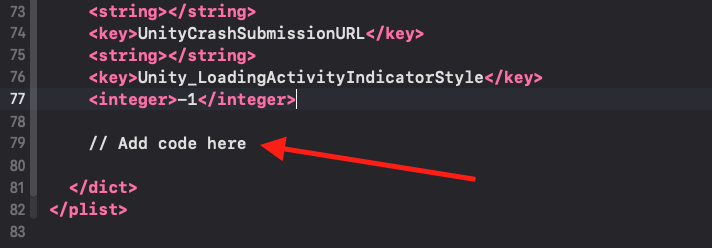
- Add the following code below:
<key>CFBundleURLTypes</key>
<array>
<dict>
<key>CFBundleTypeRole</key>
<string>Editor</string>
<key>CFBundleURLSchemes</key>
<array>
<string>fb{YOUR FB APP ID}</string>
</array>
</dict>
<dict>
<key>CFBundleTypeRole</key>
<string>Editor</string>
<key>CFBundleURLSchemes</key>
<array>
<string>{YOUR BUNDLEID}</string>
</array>
</dict>
<dict>
<key>CFBundleTypeRole</key>
<string>Editor</string>
<key>CFBundleURLSchemes</key>
<array>
<string>{REVERSED_CLIENT_ID}</string>
</array>
� </dict>
</array>
<key>CFBundleVersion</key>
<string>0</string>
<key>FacebookAdvertiserIDCollectionEnabled</key>
<true/>
<key>FacebookAppID</key>
<string>{YOUR FB APP ID}</string>
<key>FacebookClientToken</key>
<string>{YOUR FB CLIENT TOKEN}</string>
<key>FacebookDisplayName</key>
<string>DemoDzoGame</string>
<key>GIDClientID</key>
<string>{CLIENT_ID}</string>
<key>LSApplicationQueriesSchemes</key>
<array>
<string>fbapi</string>
<string>fbauth</string>
<string>fb-messenger-share-api</string>
<string>fbauth2</string>
<string>fbshareextension</string>
<string>fb</string>
</array>
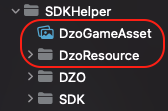
f. Images and Resources
Drag and drop your files DzoGameAsset and DzoResource into the SDKHelper folder
Step 3: Configure the file UnityAppController.mm
Please proceed by deleting the default UnityAppController.mm file located in the Classes folder of the project. Afterward, add or drag and drop the UnityAppController.mm file from the pre-configured folder into the project.
When dragging and dropping, a popup will appear. Please check the options as shown in the image below:
Step 4: Configure the project in the following order of steps: (important)
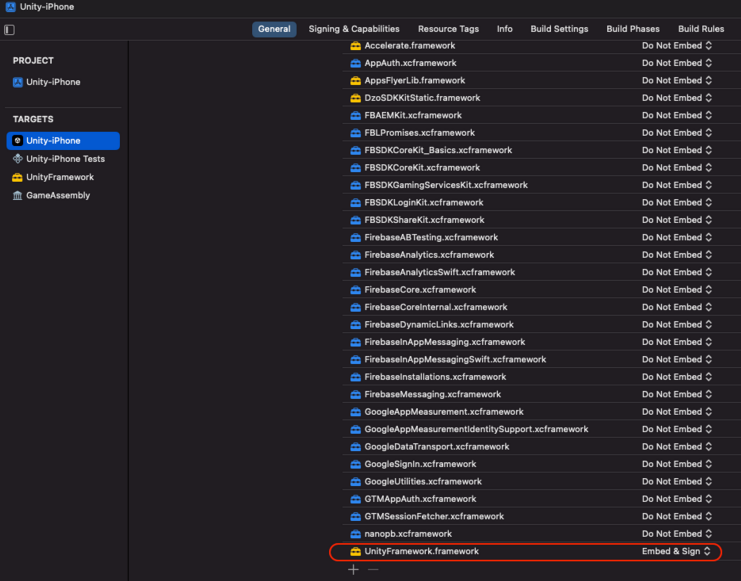
a. Select UnityFramework.framework → Click the minus sign (-) to remove it → Then click the plus sign (+) and search for UnityFramework.framework to add it back.
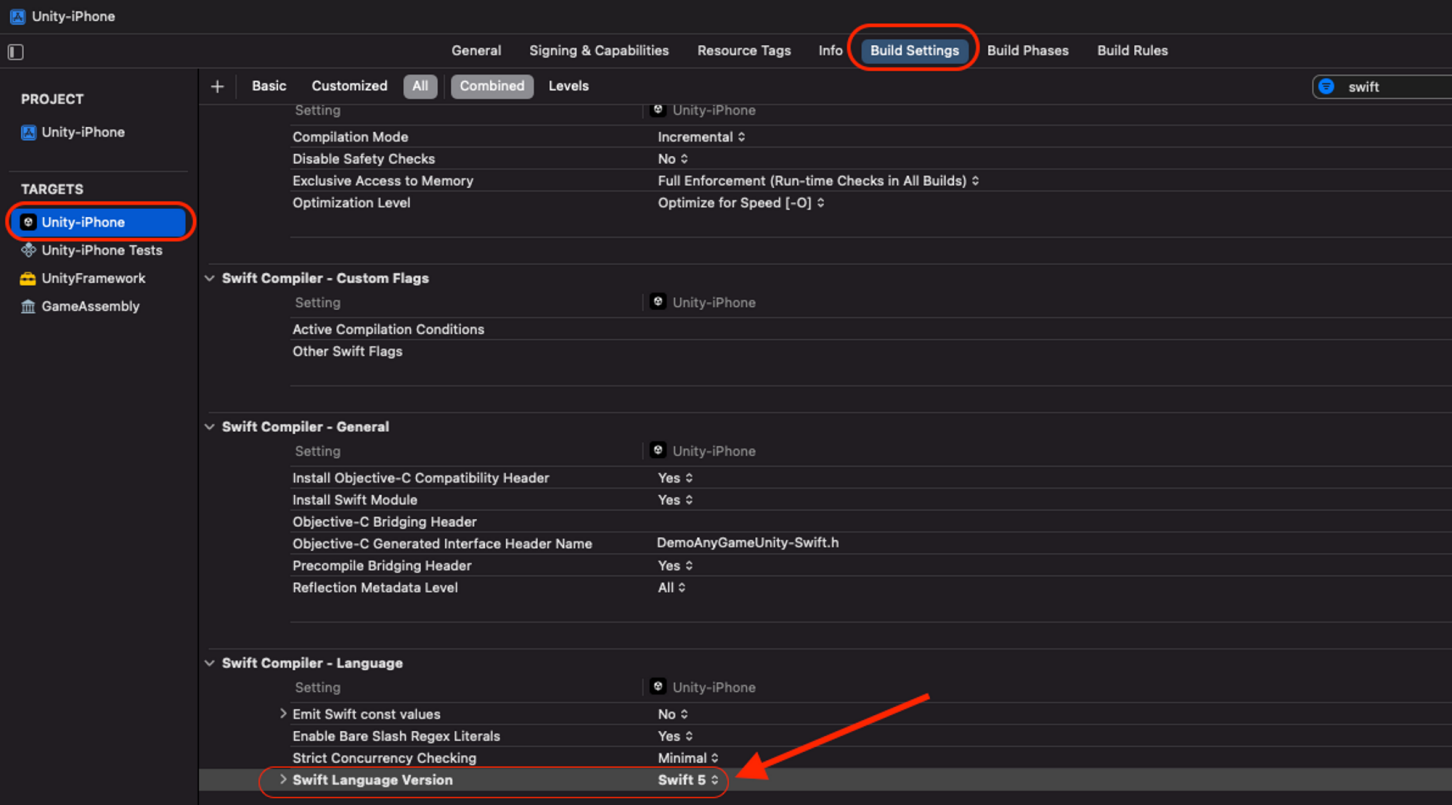
b. Value for SWIFT_VERSION cannot be empty.
In Swift Language Version, select Swift 5
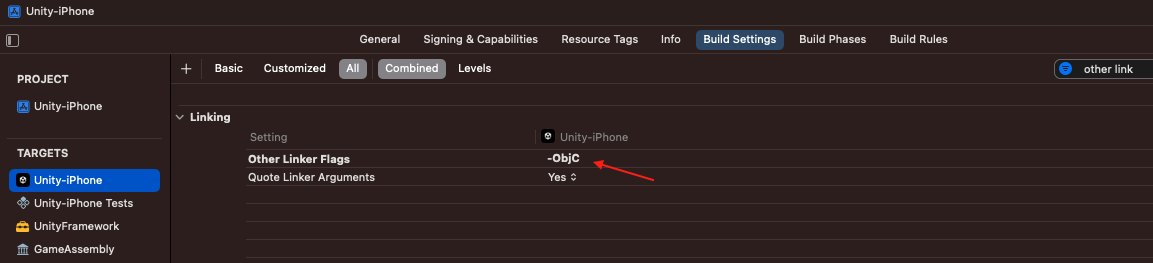
c. Add -ObjC to Targets Unity-iPhone -> Build Settings -> Other Linker Flags
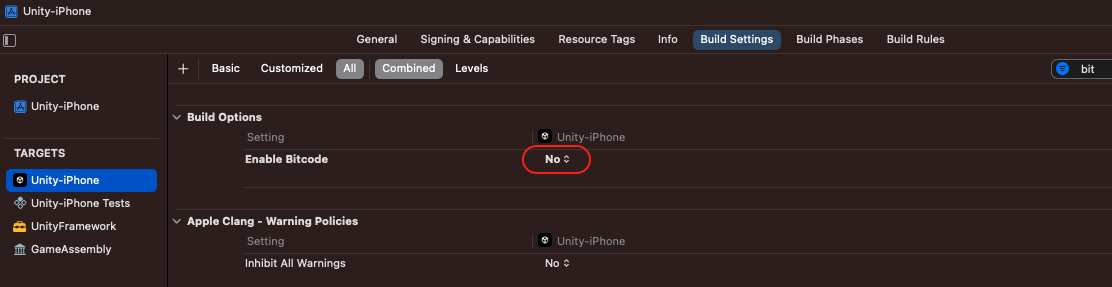
d. Enable Bitcode: Set to No
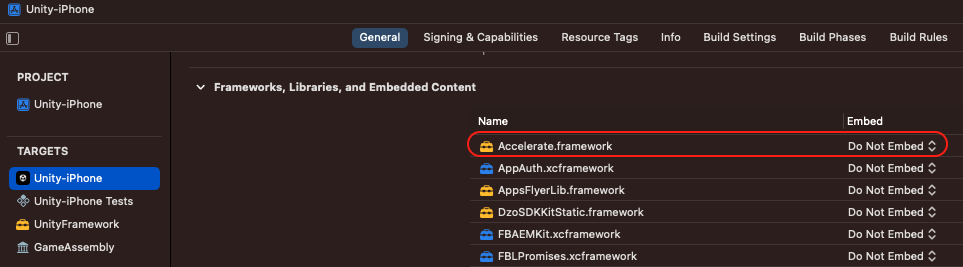
e. Add Accelerate.framework
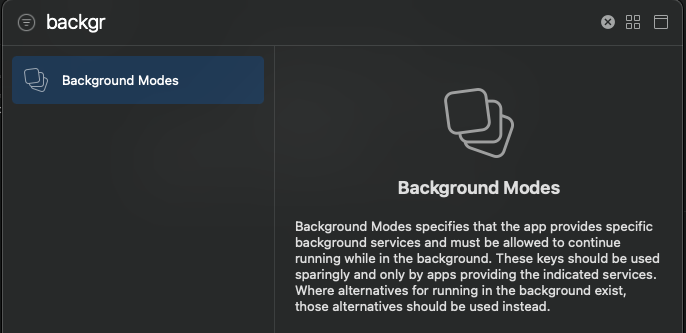
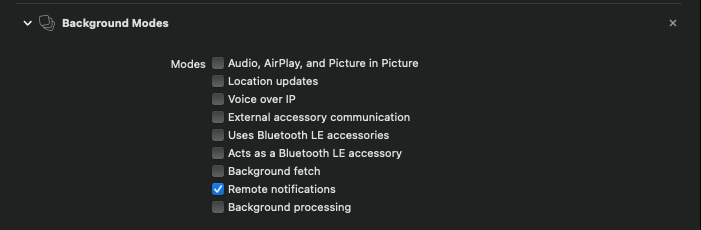
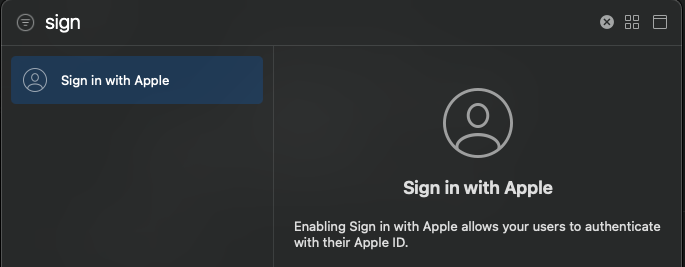
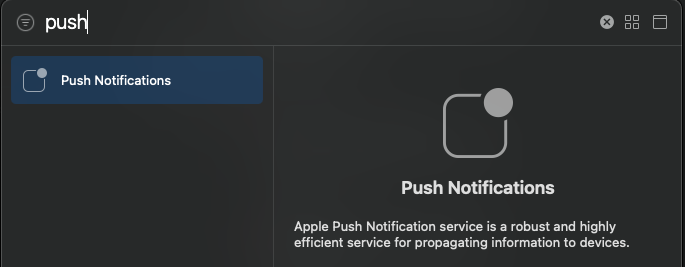
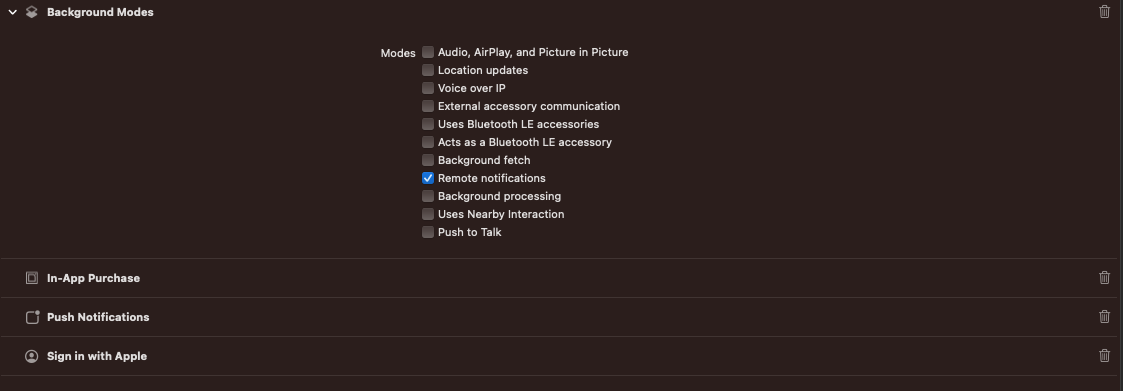
Step 5: Config Signing & Capabilites Xcode Targets / Project IOS Click + Capability

- Add Background Modes
- Add Sign in with Apple
- Add Push Notification
- Add In-App Purchase
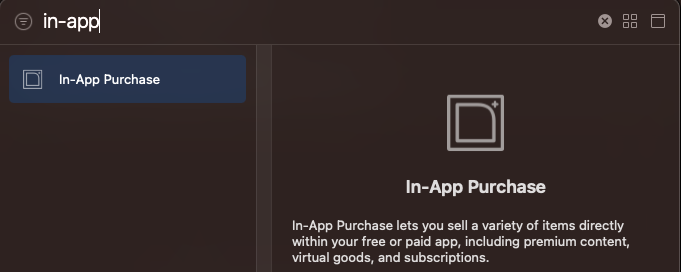
- Finally, configure it to match the settings shown in the image below.
C. Import SDK (Unity Editor)
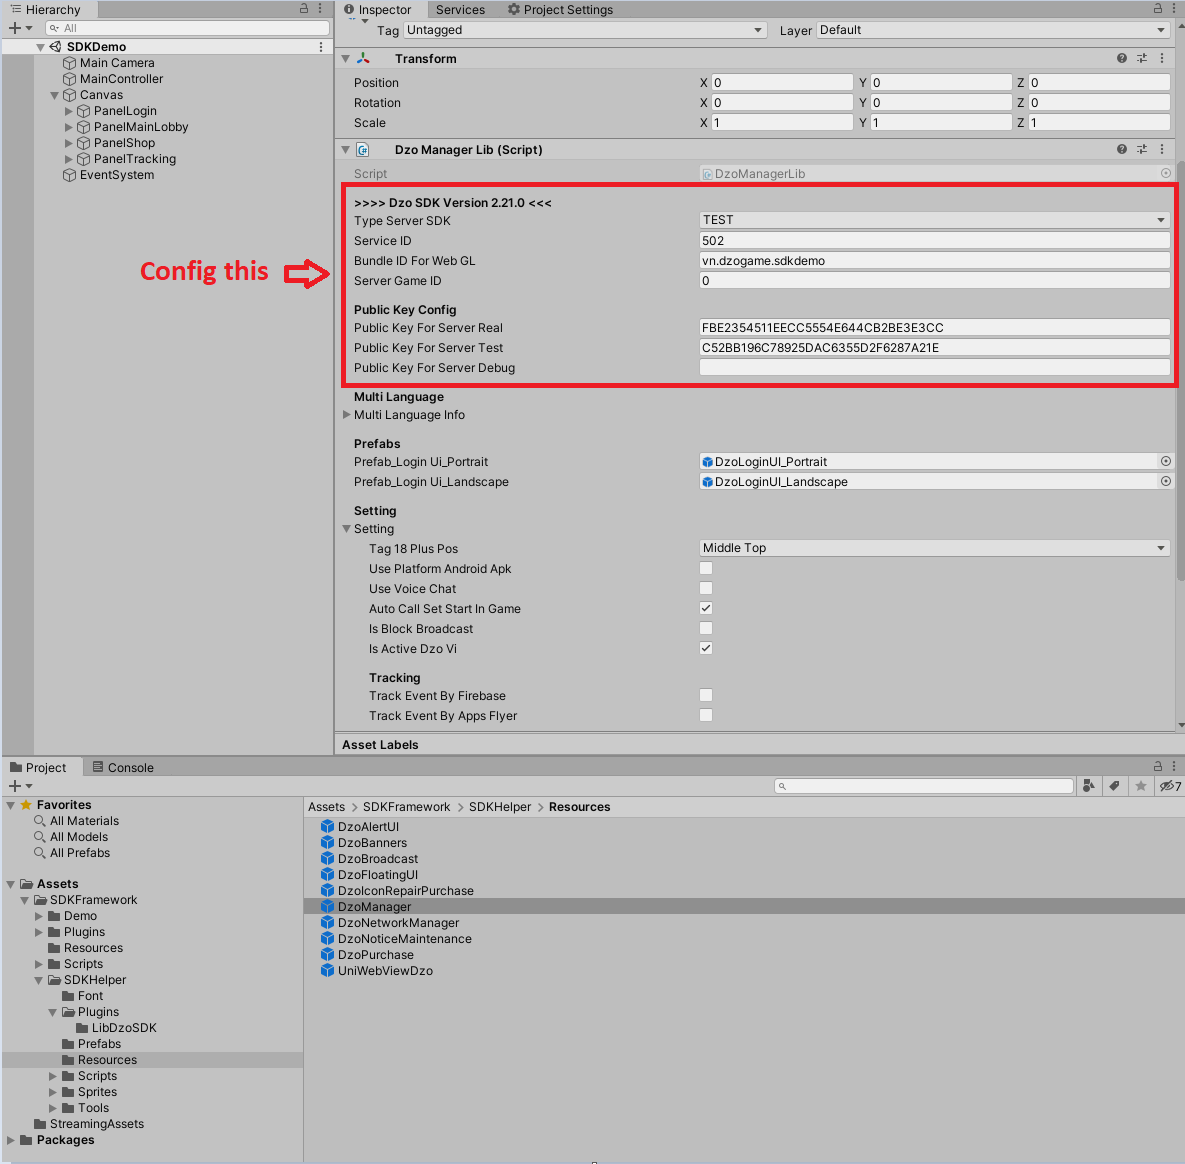
To run on Unity Editor, you need to setup prefab DzoManager first.
D. Config to run on Unity Editor Or Build Platform Standalone
In Unity, move file SDKStandaloneConfig.json to "Assets\SDKFramework\SDKForStandalone\Resources\"
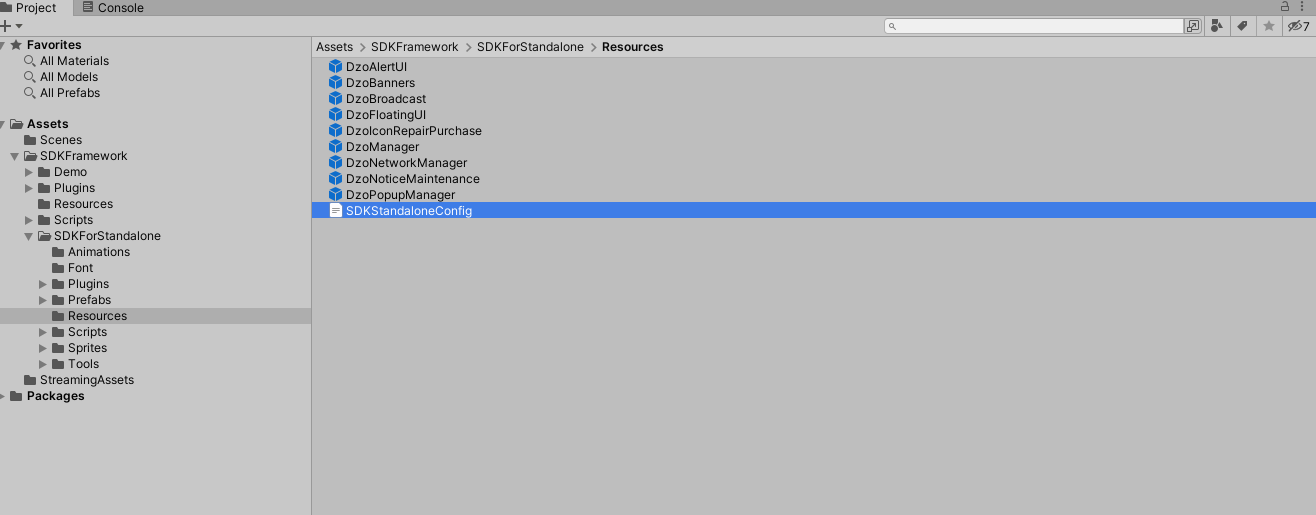
After that, choose SDK Tool -> Load Config File
